Developing Web Applications with Behat and Mink
You can use Behat to describe anything that you can describe in business logic. Tools, GUI applications, web applications, etc. The most interesting part is web applications. First, behavior-driven testing already exists in the web world - it’s called functional or acceptance testing. Almost all popular frameworks and languages provide functional testing tools. Today we’ll talk about how to use Behat for functional testing of web applications.
Understanding Mink
One of the most important parts in the web is a browser. A browser is the window through which web application users interact with the application and other users.
So, in order to test our web application, we should transform user actions into steps and expected outcomes - with Behat that’s quite simple really. The next part is much harder - run these actions and test against the expected outcome. For example, how to programmatically do things like this:
Given I am on "/index.php"
You’ll need something to simulate browser application. Scenario steps would simulate a user and the browser emulator would simulate a browser with which the user interacts in order to talk to the web application.
Now the real problem. We have 2 completely different types of solutions:
- Headless browser emulators - browser emulators that can be executed fully without GUI through console. Such emulators can do HTTP requests and emulate browser applications on a high level (HTTP stack), but on a lower level (JS, CSS) they are totally limited. They are much faster than real browsers, because you don’t need to parse CSS or execute JS in order to open pages or click links with them.
- In-browser emulators - this type of emulator works with real browsers, taking full control of them and using them as zombies for its testing needs. This way, you’ll have a standard, fully-configured, real browser, which you will be able to control. CSS styling, JS and AJAX execution - all supported out of the box.
The problem is we need both these emulator types in order to do successful functional testing. Both these tools are quite limited at some tasks, but succeed at others. For example, you can’t use in-browser emulators for all tests in your application, because this makes your tests become very slow. Also, you can’t do AJAX with a headless browser.
You should use them both. But here comes a problem - these are very different tools and they have much different APIs. Using both those APIs limits us very much and in case of Behat, this problem becomes even worse, because now you have a single:
When I go to "/news.php"
And this step should be somehow executed through one or another browser emulator at will.
Here comes Mink. Mink is a browser emulator abstraction layer. It hides emulator differences behind a single, consistent API.
Just some of the benefits:
- Single, consistent API.
- Almost zero configuration.
- Support for both in-browser and headless browser emulators.
Installing Mink
Mink is a PHP 5.3+ library that you’ll use inside your test and feature suites. Before you begin, ensure that you have at least PHP 5.3.1 installed.
Mink integration into Behat happens thanks to MinkExtension. The extension takes care of all configuration and initialization of the Mink, leaving only the fun parts to you.
Mink should be installed through Composer.
Create composer.json file in the project root:
{
    "require": {
        "behat/behat": "~2.5",
        "behat/mink-extension": "~1.3",
        "behat/mink-goutte-driver": "~1.2",
        "behat/mink-selenium2-driver": "~1.2"
    },
    "config": {
        "bin-dir": "bin/"
    }
}
Note
Note that we also installed two Mink drivers - goutte and selenium2. That’s because by default, Composer installation of Mink doesn’t include any driver - you should choose what to use by yourself.
The easiest way to get started is to go with goutte and selenium2 drivers, but note that there’s bunch of other drivers available for Mink - read about them in Mink documentation.
Then download composer.phar and run update command:
$ curl -sS https://getcomposer.org/installer | php
$ php composer.phar update
After that, you will be able to run Behat with:
$ bin/behat -h
And this executable will already autoload all the needed classes in order to activate MinkExtension through behat.yml in the project root.
Now lets activate it:
# behat.yml
default:
    extensions:
        Behat\MinkExtension\Extension:
            goutte: ~
            selenium2: ~
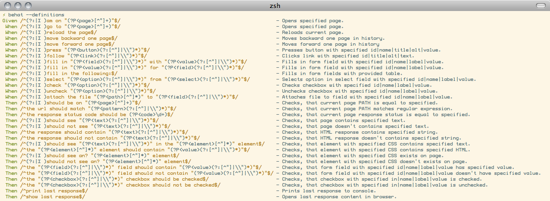
You could check that extension is properly loaded by calling:
$ bin/behat -dl
It should show you all the predefined web steps as MinkExtension will automatically use the bundled MinkContext if no user-defined context class is found.
MinkContext for Behat requirements
MinkExtension comes bundled with MinkContext, which will be used automatically by Behat as main context class if no user-defined context class found. That’s why behat -dl shows you step definitions even when you haven’t created a custom FeatureContext class or even a features folder.
Writing your first Web Feature
Let’s write a feature to test Wikipedia search abilities:
# features/search.feature
Feature: Search
  In order to see a word definition
  As a website user
  I need to be able to search for a word

  Scenario: Searching for a page that does exist
    Given I am on "/wiki/Main_Page"
    When I fill in "search" with "Behavior Driven Development"
    And I press "searchButton"
    Then I should see "agile software development"

  Scenario: Searching for a page that does NOT exist
    Given I am on "/wiki/Main_Page"
    When I fill in "search" with "Glory Driven Development"
    And I press "searchButton"
    Then I should see "Search results"
We have two scenarios here:
- Searching for a page that does exist - describes how Wikipedia searches for pages that do exist in Wikipedia’s index.
- Searching for a page that does NOT exist - describes how Wikipedia searches for pages that do not exist in Wikipedia’s index.
As you might see, URLs in scenarios are relative, so we should provide the correct base_url option for MinkExtension in our behat.yml:
# behat.yml
default:
    extensions:
        Behat\MinkExtension\Extension:
            base_url: http://en.wikipedia.org
            goutte: ~
            selenium2: ~
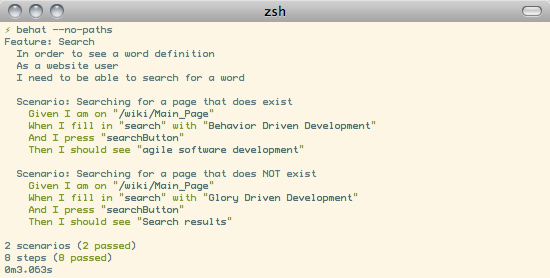
Now, run your feature:
$ bin/behat features/search.feature
You’ll see output like this:
Test In-Browser - selenium2 Session
OK. We’ve successfully described Wikipedia search and Behat tested it flawlessly. But what about search field autocompletion? It’s done using JS and AJAX, so we can’t use the default headless session to test it - we need a javascript session and Selenium2 browser emulator for that task.
Selenium2 gives you the ability to take full control of a real browser with a clean consistent proxy API. And Mink uses this API extensively in order to use the same Mink API and steps to do real actions in a real browser.
All you need to do is install Selenium:
Download latest Selenium jar from the: http://seleniumhq.org/download/
Run Selenium2 jar before your test suites (you can start this proxy during system startup):
java -jar selenium-server-*.jar
That’s it. Now you should create a specific scenario in order for it to be runnable through Selenium:
Scenario: Searching for a page with autocompletion
  Given I am on "/wiki/Main_Page"
  When I fill in "search" with "Behavior Driv"
  And I wait for the suggestion box to appear
  Then I should see "Behavior Driven Development"
Now, we need to tell Behat and Mink to run this scenario in a different session (with a different browser emulator). Mink comes with a special hook, that searches @javascript or @mink:selenium2 tag before scenario and switches the current Mink session to Selenium2 (in both cases). So, let’s simply add this tag to our scenario:
@javascript
Scenario: Searching for a page with autocompletion
  Given I am on "/wiki/Main_Page"
  When I fill in "search" with "Behavior Driv"
  And I wait for the suggestion box to appear
  Then I should see "Behavior-driven development"
Now run your feature again:
$ bin/behat features/search.feature
And of course, you’ll get:
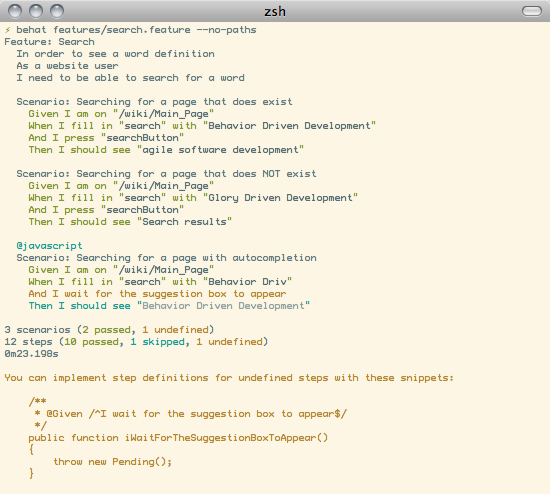
That’s because you have used custom Then I wait for the suggestion box to appear step, but have not defined it yet. In order to do that, we will need to create our own FeatureContext class (at last).
Defining our own FeatureContext
The easiest way to create context class is to ask Behat do it for you:
$ bin/behat --init
This command will create features/bootstrap folder and features/bootstrap/FeatureContext.php class for you.
Now lets try to run our feature again (just to check that everything works):
$ bin/behat features/search.feature
Oh... Now Behat tells us that all steps are undefined. What’s happening there?
As we’ve created our own context class, MinkExtension stopped using its own bundled context class as main context and Behat uses your very own FeatureContext instead, which of course doesn’t have those Mink steps yet. Let’s add them.
There are multiple ways to bring the steps that are bundled with MinkExtension into your own context class. The simplest one is to use inheritance. Just extend your context from Behat\MinkExtension\Context\MinkContext instead of the base BehatContext.
Note that you will also have to do this if you’ve already been using Behat in your project, but without Mink, and are now adding Mink to your testing:
<?php

use Behat\Behat\Context\ClosuredContextInterface,
    Behat\Behat\Context\TranslatedContextInterface,
    Behat\Behat\Context\BehatContext,
    Behat\Behat\Exception\PendingException;
use Behat\Gherkin\Node\PyStringNode,
    Behat\Gherkin\Node\TableNode;

use Behat\MinkExtension\Context\MinkContext;

/**
 * Features context.
 */
class FeatureContext extends MinkContext
{
}
To check that all MinkExtension steps are here again, run:
$ bin/behat -dl
If all works properly, you should see something like this:
Finally, lets add our custom wait step to context:
/**
 * @Then /^I wait for the suggestion box to appear$/
 */
public function iWaitForTheSuggestionBoxToAppear()
{
    $this->getSession()->wait(5000,
        "$('.suggestions-results').children().length > 0"
    );
}
That simple. We get the current session and send a JS command to wait (sleep) for 5 seconds or until the expression in the second argument returns true. The second argument is a simple jQuery instruction.
Run the feature again and:
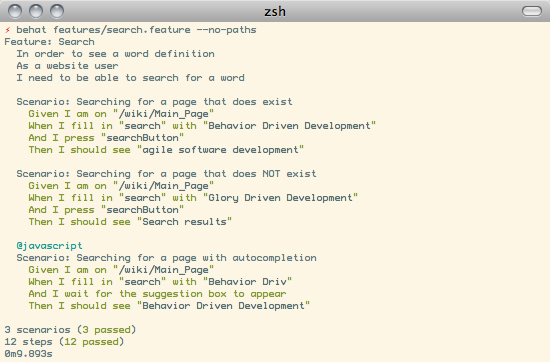
Voilà!
Tip
Context isolation is a very important thing in functional tests. But restarting the browser after each scenario could slow down your feature suite very much. So by default, Mink tries hard to reset your browser session without reloading it (cleans all domain cookies).
In some cases it might not be enough (when you use http-only cookies for example). In that case, just add an @insulated tag to your scenario. The browser in this case will be fully reloaded and cleaned (before scenario):
Feature: Some feature with insulated scenario

  @javascript @insulated
  Scenario: isolated scenario
    #...
Going further
Read more cookbook articles on Behat and Mink interactions: